Advanced Custom Deserialization With EasyNetQ Version 8 In C# & .NET
[C#, .NET, RabbitMQ, EasyNetQ, StarLibrary]
The past few posts, “Using EasyNetQ Version 8 in C# & .NET” and “Configuring Serialization For EasyNetQ Version 8 In C# & .NET” have looked at the overhauled EasyNetQ 8 package and how it can be leveraged to control serialization and deserialization to RabbitMQ.
In this post, we will look at a scenario in which we can override the EasyNetQ serialization logic to dynamically modify what is retrieved from the message broker without changing our core application logic.
For this example, we will use the following type.
[Queue("ActiveSpies")]
public sealed class Spy
{
    public string FirstName { get; set; }
    public string Surname { get; set; }
    public DateTime DateOfBirth { get; set; }
}
Here, the Queue attribute indicates the queue in which we store the object.
Our scenario is as follows:
- We have a Publisher console application. This generates
Spyobjects with full metadata - We have a Subscriber console application. This receives
Spyobjects from the message broker. However, it is aware that theDateOfBirthis6months too late, and does not care about the time of the date of birth.
Typically, you would do this manipulation after retrieving the message from RabbitMQ.
This example will show how to do it during retrieval.
We start off by creating a directory to store our projects (we will need 3).
mkdir AdvancedEasyNetQ
Change to the directory:
cd AdvancedEasyNetQ/
Create our 3 projects:
dotnet new console -o Client
dotnet new console -o Server
dotnet new classlib -o Logic
Logic is a shared project that will store our type definition, which is referenced from the Client and Server projects.
Create a solution:
dotnet new sln
Add our projects to the solution:
dotnet sln add Client/ Logic/ Server/
Next, add a reference to Logic from Client and Server
dotnet add reference ../Logic
Finally, add a reference to EasyNetQ to all 3 projects.
donnet add package EasyNetQ
In our Logic project, we add the Spy type specified above.
In our Server project, we create a BackgroundService that does the work.
To help in generating test data, we add the Bogus package.
dotnet add package Bogus
The code for the service is as follows:
using Bogus;
using EasyNetQ;
using Logic;
using Microsoft.Extensions.Hosting;
using Microsoft.Extensions.Logging;

namespace Server;

public class Publisher : BackgroundService
{
    private readonly IPubSub _pubSub;
    private readonly ILogger<Publisher> _logger;
    private readonly Faker<Spy> _faker;

    // Inject publisher and logger
    public Publisher(IPubSub pubSub, ILogger<Publisher> logger)
    {
        _pubSub = pubSub;
        _logger = logger;
        // Configure Bogus to generate spies
        _faker = new Faker<Spy>()
            .RuleFor(o => o.FirstName, f => f.Name.FirstName())
            .RuleFor(o => o.Surname, f => f.Name.LastName())
            .RuleFor(o => o.DateOfBirth, f => f.Date.Past(50));
    }

    protected override async Task ExecuteAsync(CancellationToken stoppingToken)
    {
        // Wait for the subscriber to start first
        await Task.Delay(TimeSpan.FromSeconds(5), stoppingToken);

        _logger.LogInformation("Publisher started");

        // Loop until application is stopped
        while (!stoppingToken.IsCancellationRequested)
        {
            // Generate spy
            var spy = _faker.Generate();

            // Publish the spy
            await _pubSub.PublishAsync(spy, stoppingToken);

            // Log what was published
            _logger.LogInformation(
                "Sent: {Surname} - {FirstName}, {DateOfBirth}", spy.Surname, spy.FirstName,
                spy.DateOfBirth);

            // Wait
            await Task.Delay(TimeSpan.FromSeconds(1), stoppingToken);
        }
    }
}
Next, we set up the host:
using EasyNetQ;
using Microsoft.Extensions.Hosting;
using System.Text.Json;
using Microsoft.Extensions.DependencyInjection;
using Serilog;
using Server;

// Configure Serilog
Log.Logger = new LoggerConfiguration()
    .WriteTo.Console()
    .CreateLogger();

var builder = Host.CreateDefaultBuilder(args);
builder.UseSerilog();

// Configure DI
builder.ConfigureServices((context, services) =>
{
    const string connection = "host=localhost;username=test;password=test";

    var options = new JsonSerializerOptions();
    services.AddEasyNetQ(connection).UseSystemTextJsonV2(options);
    services.AddHostedService<Publisher>();
});

// Start the application
var host = builder.Build();

await host.RunAsync();
Next, we turn to the Client project.
This also has a BackgroundService:
using EasyNetQ;
using Logic;
using Microsoft.Extensions.Hosting;
using Microsoft.Extensions.Logging;

namespace Client;

public class Subscriber : BackgroundService
{
    private readonly IPubSub _pubSub;
    private readonly ILogger<Subscriber> _logger;

    // Inject subscriber and logger
    public Subscriber(IPubSub pubSub, ILogger<Subscriber> logger)
    {
        _pubSub = pubSub;
        _logger = logger;
    }

    protected override async Task ExecuteAsync(CancellationToken stoppingToken)
    {
        // Configure subscription event
        await _pubSub.SubscribeAsync<Spy>("ConsoleSubscriber", message =>
        {
            // Log result
            _logger.LogInformation(
                "Received: {Surname} - {FirstName}, {DateOfBirth}", message.Surname, message.FirstName,
                message.DateOfBirth);
        }, cancellationToken: stoppingToken);
    }
}
Our problem definition was that there was an issue with the DateOfBirth:
However, it is aware that the
DateOfBirthis6months too late, and does not care about the time of the date of birth.
We can solve this by writing a JsonConverer. We have looked at these before.
using System.Globalization;
using System.Text.Json;
using System.Text.Json.Serialization;

namespace Client;

// Essentially parse the date, extract the date, and move it back 6 months
public class JsonTimeAdjustedConverter : JsonConverter<DateTime>
{
    // This is the deserializer
    public override DateTime Read(ref Utf8JsonReader reader, Type typeToConvert, JsonSerializerOptions options)
    {
        return DateTime.Parse(reader.GetString()!, CultureInfo.InvariantCulture).Date.AddMonths(-6);
    }

    // This is the serializer
    public override void Write(Utf8JsonWriter writer, DateTime value, JsonSerializerOptions options)
    {
        writer.WriteStringValue(value.ToString(CultureInfo.InvariantCulture));
    }
}
Finally, we wire our Client host and set up our dependency injection to use this JsonConverter.
using System.Text.Json;
using Client;
using EasyNetQ;
using Microsoft.Extensions.DependencyInjection;
using Microsoft.Extensions.Hosting;
using Serilog;

// Setup logging
Log.Logger = new LoggerConfiguration()
    .WriteTo.Console()
    .CreateLogger();

var builder = Host.CreateDefaultBuilder(args);
builder.UseSerilog();

// Configure DI
builder.ConfigureServices((context, services) =>
{
    const string connection = "host=localhost;username=test;password=test";

    // Configure our serializer to attach the JsonConverer
    var options = new JsonSerializerOptions
    {
        Converters = { new JsonTimeAdjustedConverter() }
    };

    // Wire in EasyNetQ
    services.AddEasyNetQ(connection).UseSystemTextJsonV2(options);
    services.AddHostedService<Subscriber>();
});

// Build the host
var host = builder.Build();

// Start the app
await host.RunAsync();
Using your IDE of choice, set up your solution to run both apps simultaneously.
In JetBrains Rider, it looks like this:
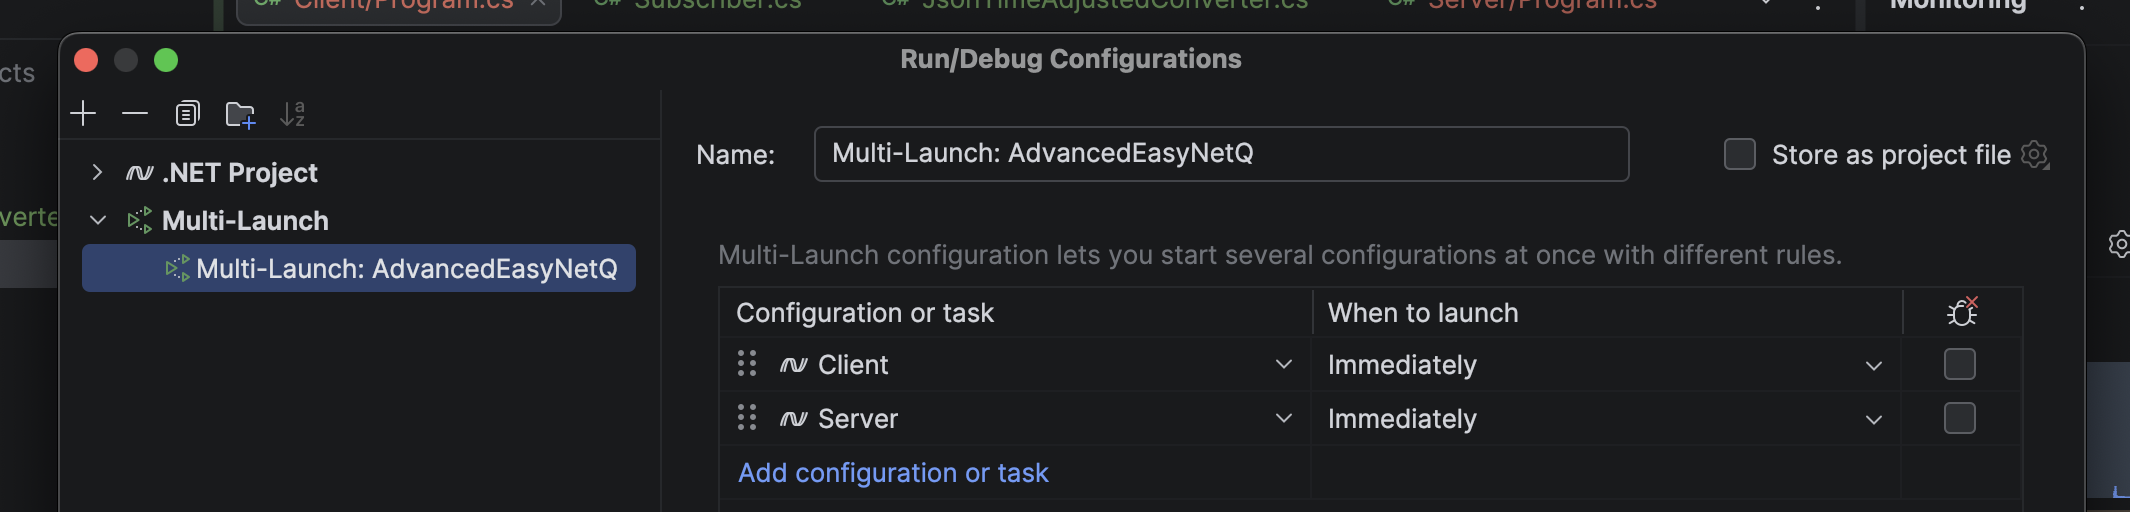
You should see two consoles for each of the projects:
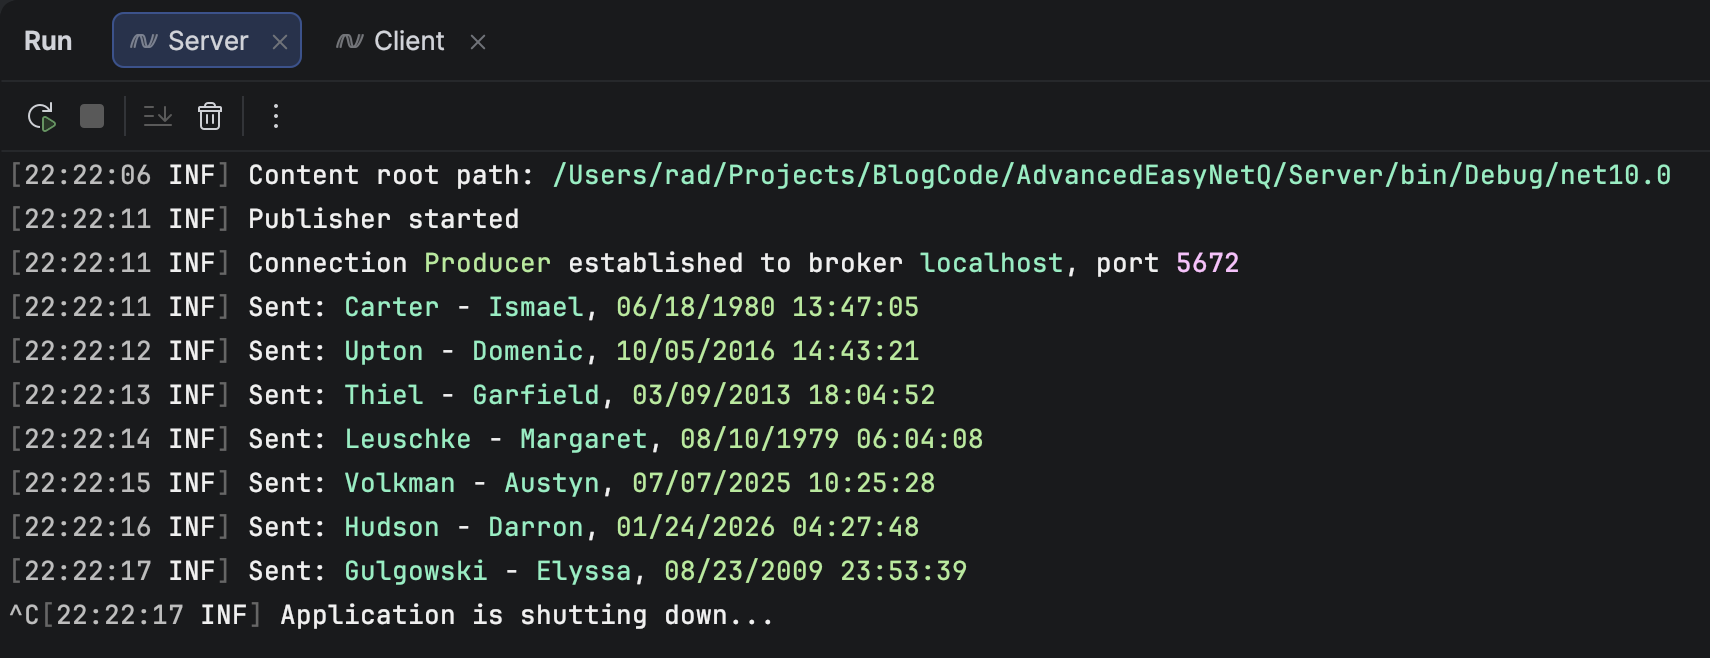
The Server will look like this:
The Client will look like this:
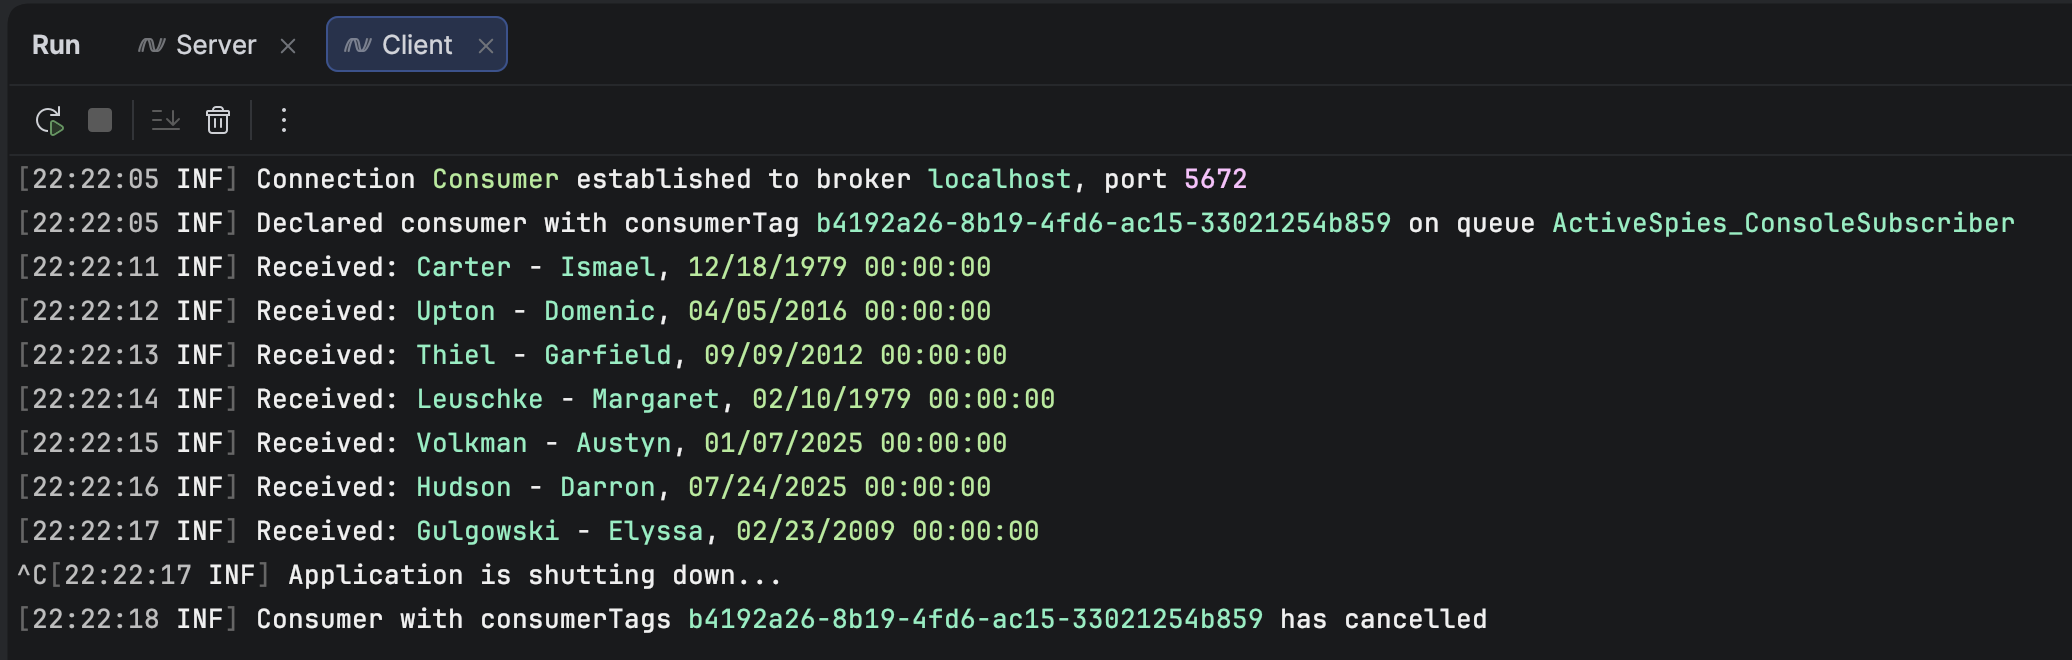
You can see that Carter, Ismael DateOfBirth on the client side now is midnight, 6 months earlier than it was on the Server.
We can thus have granular control over the serialization and deserialization of our types.
This is very useful when interfacing with other systems that may not support the exact types that .NET does.
There is, of course, the question of whether this is the best place to have such logic.
That, I leave to you to decide!
TLDR
You can control almost any aspect of the serialization of types to RabbitMQ using EasyNetQ.
The code is in my GitHub.
Happy hacking!