Scheduling Libraries In C# & .NET - Part 3 - TickerQ
[Series, C#, .NET, Scheduling, TickerQ, StarLibraries]
This is Part 3 of a series on scheduling libraries in C# & .NET.
In this post, we will look at the TickerQ library.
Configuration & Setup
To demonstrate this, we shall start with a simple web application.
dotnet new web -o TickerQWeb
To set up the library, use nuget to install the TickerQ package.
dotnet add package TickerQ
We also add our Serilog packages for logging.
dotnet add package Serilog.AspNetCore
dotnet add package Serilog.Sinks.Console
We then set up our web application in the Program.cs file as follows:
using Serilog;
using TickerQ.DependencyInjection;

Log.Logger = new LoggerConfiguration()
    .WriteTo.Console()
    .CreateLogger();

var builder = WebApplication.CreateBuilder(args);
builder.Services.AddSerilog();
// Register TickerQ services
builder.Services.AddTickerQ();

var app = builder.Build();
app.UseTickerQ();
// Activate the processor
await app.RunAsync();
With this in place, the next order of business is to set up our jobs.
Jobs are implemented as functions decorated with the TickerFunction attribute.
Let us implement a simple job that will print the current UTC time.
using TickerQ.Utilities.Base;

public sealed class TimeJob
{
    private readonly ILogger<Program> _logger;

    public TimeJob(ILogger<Program> logger)
    {
        _logger = logger;
    }

    [TickerFunction("UTCTime")]
    public void PrintUTCTime(TickerFunctionContext ctx, CancellationToken ct)
    {
        _logger.LogInformation("The time now is {CurrentTime:d MMM yyyy HH:mm:ss zzz} (JobID {JobID})",
            DateTime.UtcNow, ctx.Id);
    }
}
We want this job to run every 20 seconds. We can achieve this by setting the CronExpression property of the TickerFunction attribute.
You can get a primer on using cron expressions here.
The updated function now looks like this:
public sealed class TimeJob
{
    private readonly ILogger<Program> _logger;

    public TimeJob(ILogger<Program> logger)
    {
        _logger = logger;
    }

    [TickerFunction("UTCTime", cronExpression: "*/20 * * * * *")]
    public void PrintUTCTime(TickerFunctionContext ctx, CancellationToken ct)
    {
        _logger.LogInformation("The time now is {CurrentTime:d MMM yyyy HH:mm:ss zzz} (JobID {JobID})",
            DateTime.UtcNow, ctx.Id);
    }
}
If we run the application, we should see something like this:
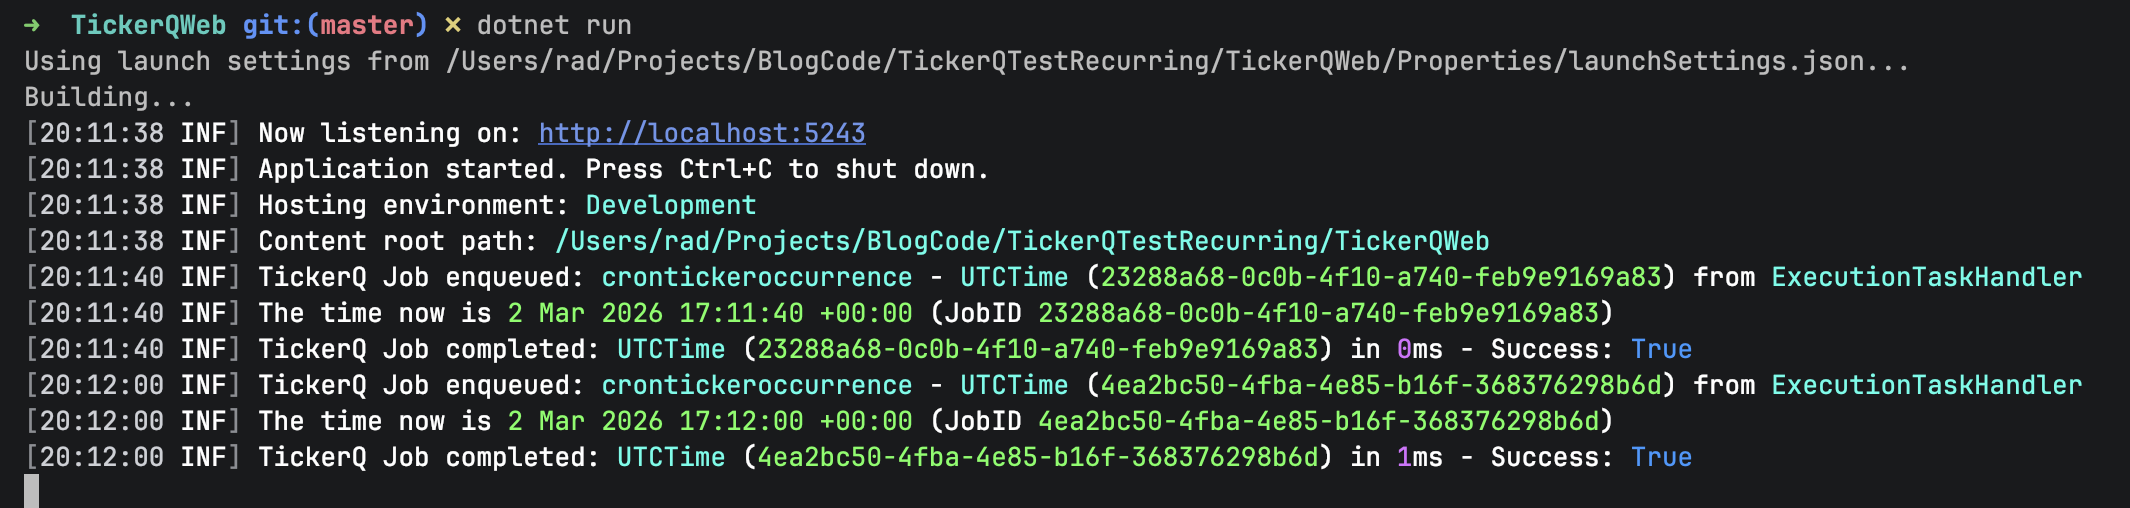
You can see here that every 20 seconds, the current UTC time is being printed.
Like Hangfire, and Quartz, TickerQ (optionally) supports storage to a database. You will first need to add the following package for Entity Framework Core support:
dotnet add package TickerQ.EntityFrameworkCore
The following databases are supported:
Depending on the datastore you want to use, you must install the corresponding package.
| Database | Package |
|---|---|
| SQL Server | Microsoft.EntityFrameworkCore.SqlServer |
| PostgreSQL | Npgsql.EntityFrameworkCore.PostgreSQL |
| SQLite | Microsoft.EntityFrameworkCore.Sqlite |
| MySQL | Pomelo.EntityFrameworkCore.MySql |
For this example, we will be using PostgreSQL.
You will therefore need to install the corresponding package:
dotnet add package Npgsql.EntityFrameworkCore.PostgreSQL
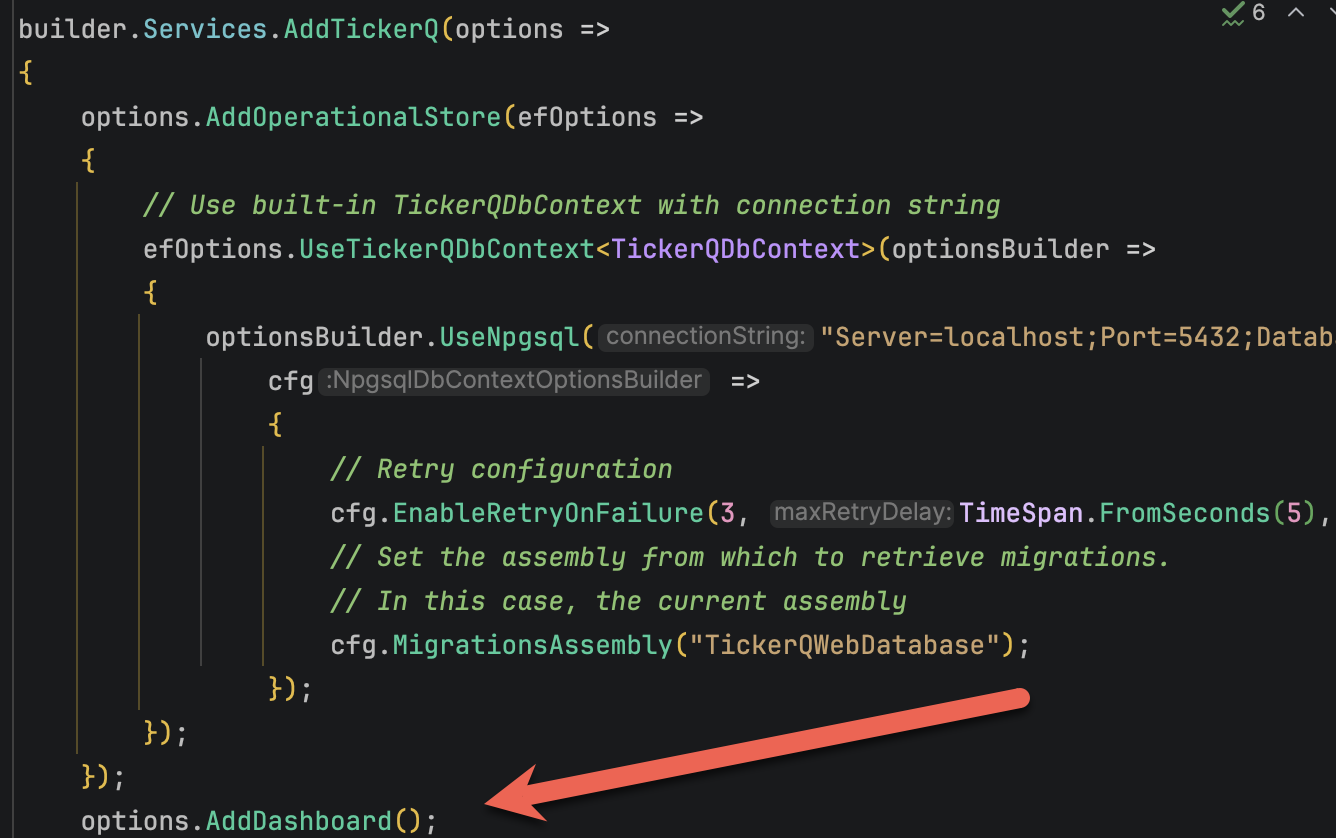
Finally, we configure TickerQ.
The first order of business is configuring the TickerQ database access.
This is done as follows:
// Register TickerQ services
builder.Services.AddTickerQ(options =>
{
    options.AddOperationalStore(efOptions =>
    {
        // Use built-in TickerQDbContext with connection string
        efOptions.UseTickerQDbContext<TickerQDbContext>(optionsBuilder =>
        {
            optionsBuilder.UseNpgsql("Server=localhost;Port=5432;Database=tickerq;User Id=myuser;Password=mypassword;",
                cfg =>
                {
                    // Retry configuration
                    cfg.EnableRetryOnFailure(3, TimeSpan.FromSeconds(5), ["40P01"]);
                    // Set the assembly from which to retrieve migrations.
                    // In this case, the current assembly
                    cfg.MigrationsAssembly("TickerQWebDatabase");
                });
        });
    });
});
The 40P01 is a reference to a PostgreSQL error that we intend to ignore for this purpose.
Next, we use Entity Framework migrations to set up the database objects.
dotnet ef migrations add Init
Here we are naming our initial migration Init.
You should see the following:

With the migrations generated, we now apply them.
dotnet ef database update
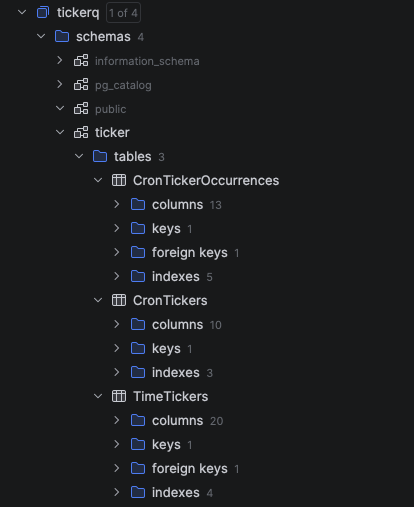
You should see output like this:
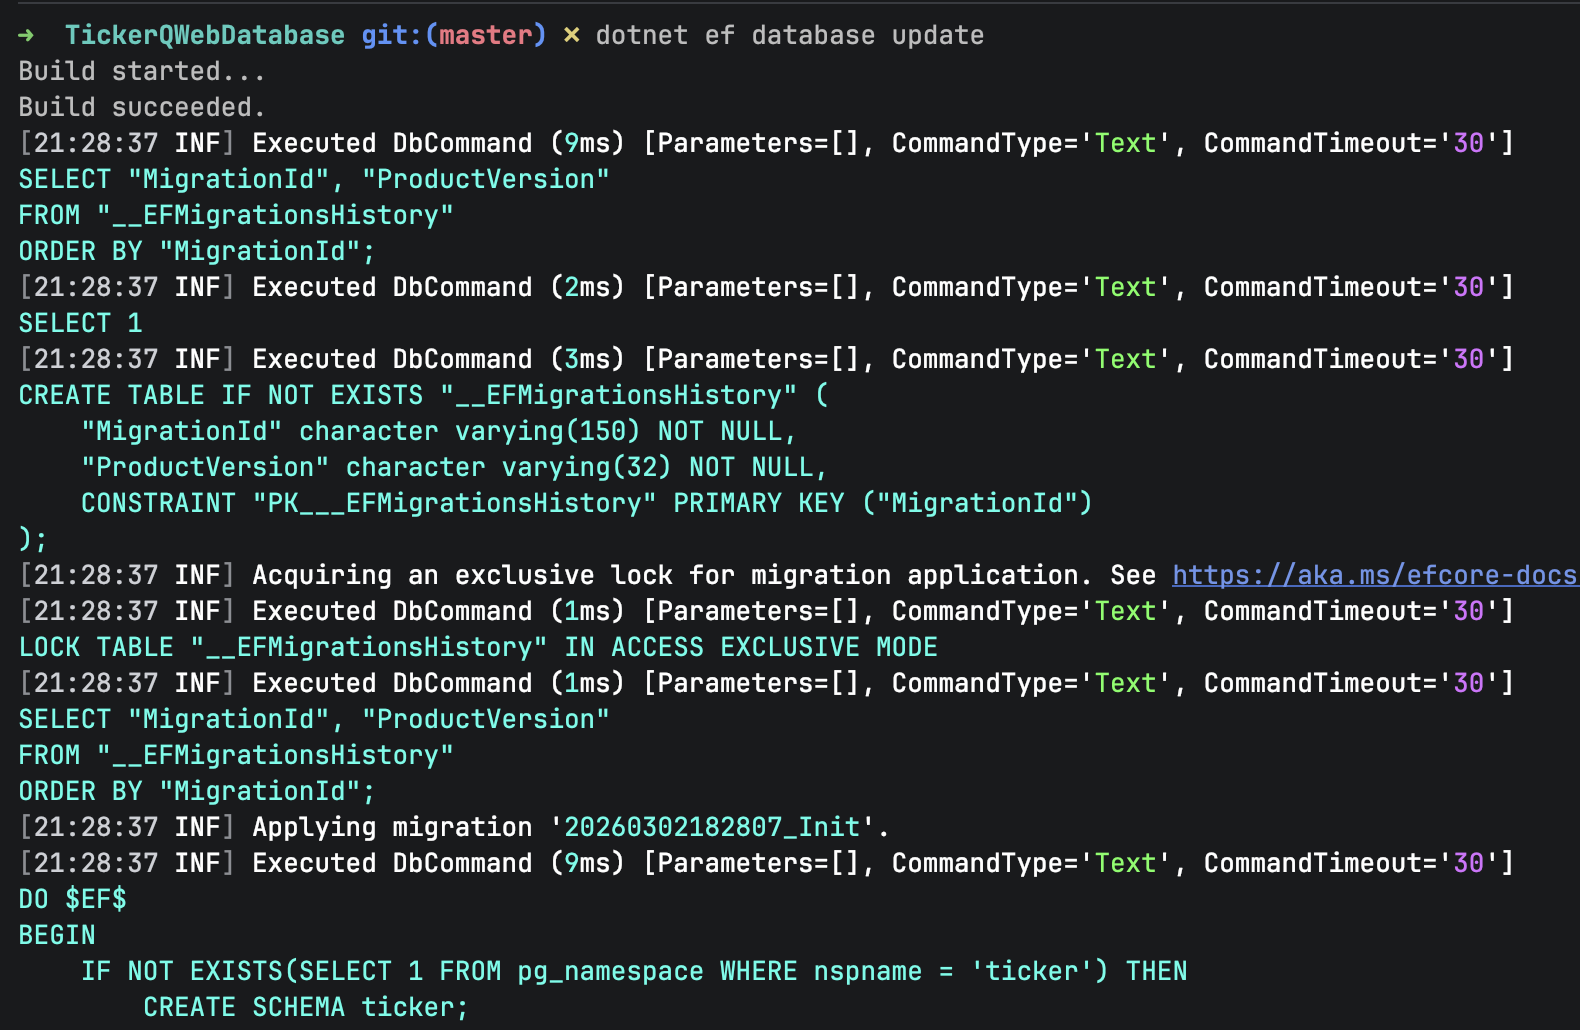
Here we can see the various database objects are being set up.
Finally, we set up our job.
In this example, we want to print the UTC time daily at 9:45 PM.
using TickerQ.Utilities.Base;

public sealed class TimeJob
{
    private readonly ILogger<Program> _logger;

    public TimeJob(ILogger<Program> logger)
    {
        _logger = logger;
    }

    // Set function to run daily at 9:45 PM
    [TickerFunction("UTCTime", cronExpression: "0 45 21 * * *")]
    public void PrintUTCTime(TickerFunctionContext ctx, CancellationToken ct)
    {
        _logger.LogInformation("The time now is {CurrentTime:d MMM yyyy HH:mm:ss zzz} (JobID {JobID})",
            DateTime.UtcNow, ctx.Id);
    }
}
When we run our application, we should see the following at the appointed time:

Features Of Note
Dashboard Support
TickerQ supports an admin dashboard.
We start off by adding the appropriate package:
dotnet add package TickerQ.Dashboard
Next, we configure the services to add the dashboard.
The dashboard is now visible at this URL: http://localhost:5000/tickerq/dashboard
Replace 5001 with the port of your application.
You can check what it is at startup:

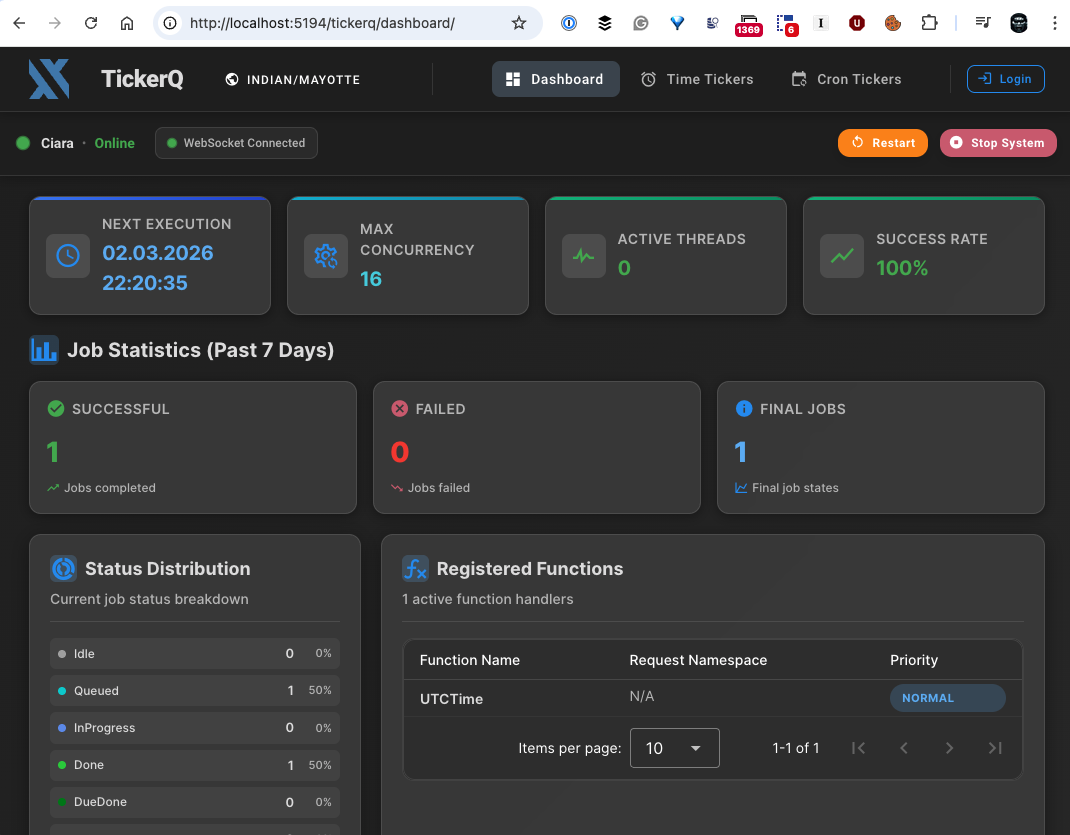
The dashboard looks like this:
You can also configure the dashboard to set various options:
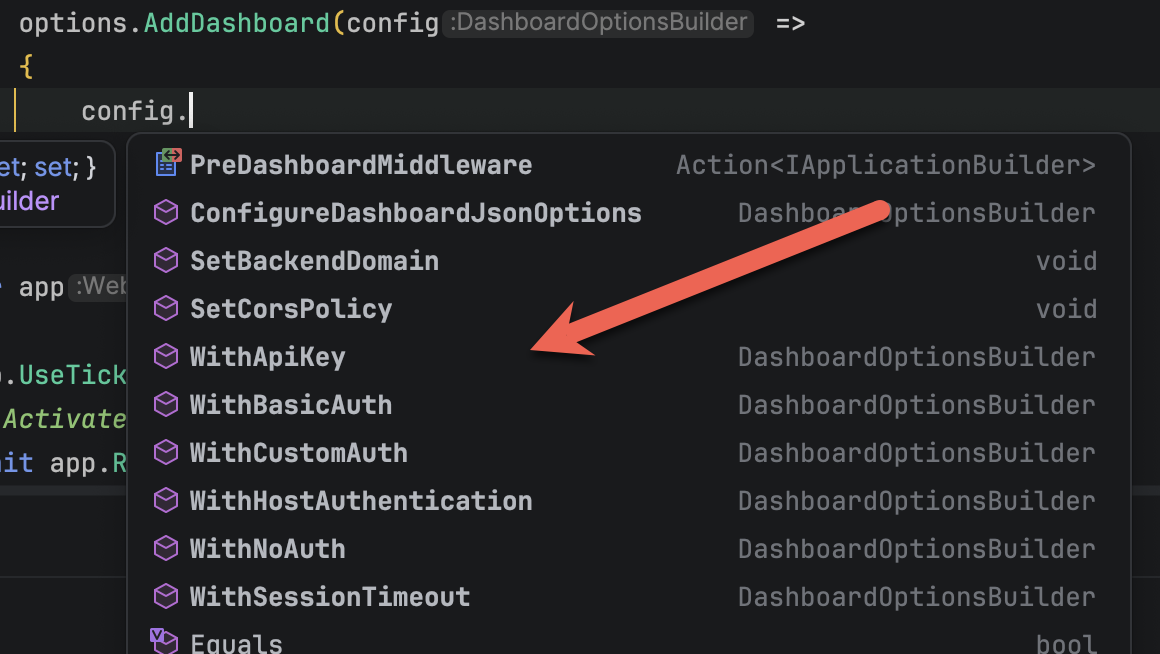
For example, we can set a username and password like so:
options.AddDashboard(config =>
{
    // configure security
    config.WithBasicAuth("admin", "admin");
});
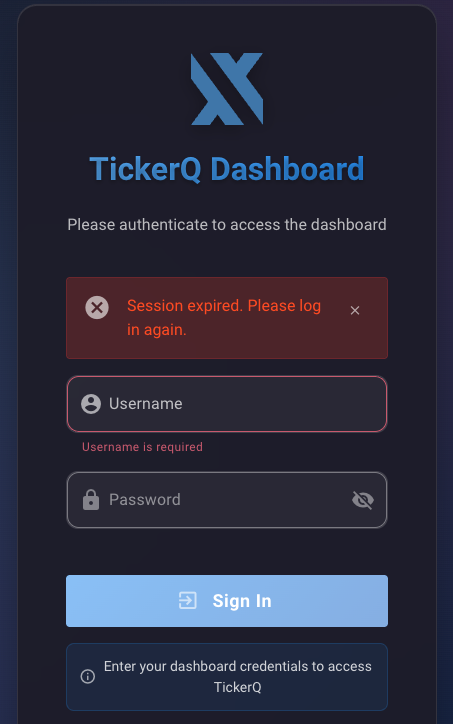
Upon restarting, you will get the following screen:
TLDR
In this post, we have looked at how to use the TickerQ library for recurrent and timed schedules, as well as how to use it in a traditional .NET application with an application host (Web, API, or WorkerService)**
The code is in my GitHub.
Happy hacking!