Sending Email In C# & .NET - Part 4 - Using Office 365 & MS Graph API
[C#, .NET, Email, Microsoft Graph]
This is Part 4 of a series on sending email.
- Sending Email in C# & .NET - Part 1 - Introduction
- Sending Email in C# & .NET - Part 2 - Delivery
- Sending Email in C# & .NET - Part 3 - Using Gmail
- Sending Email In C# & .NET - Part 4 - Using Office 365 & MS Graph API (This Post)
- Sending Email In C# & .NET - Part 5 - Using Google Cloud API
- Sending Email In C# & .NET - Part 6 - Testing SMTP Locally Using PaperCut
- Sending Email In C# & .NET - Part 7 - Sending Inline Images Using SMTP
- Sending Email In C# & .NET - Part 8 - Sending HTML Email Using SMTP
- Sending Email In C# & .NET - Part 9 - Sending Multiple Format Email Using SMTP
- Sending Email In C# & .NET - Part 10 - Sending Plain Text Email Using MailKit
- Sending Email In C# & .NET - Part 11 - Sending HTML Email Using MailKit
- Sending Email In C# & .NET - Part 12 - Sending Email With Attachments Using MailKit
- Sending Email In C# & .NET - Part 13 - Sending Email With Inline Attachments Using MailKit
- Sending Email In C# & .NET - Part 14 - Sending Multiple Format Email Using MailKit
- Sending Email In C# & .NET - Part 15 - Sending Calendar Invites Using MailKit
- Sending Email In C# & .NET - Part 16 - Testing SMTP Locally Using Mailpit
In our last post, we looked at how to send email using Gmail.
In this post, we will look at how to send email using Office 365.
Historically, it was possible to send email through SMTP. However, Microsoft is deprecating this and recommending the use of the Graph API instead.
It requires quite a bit more legwork, as outlined below.
First, register an app in the Azure Portal. You will need to create an Azure account if you do not already have one.
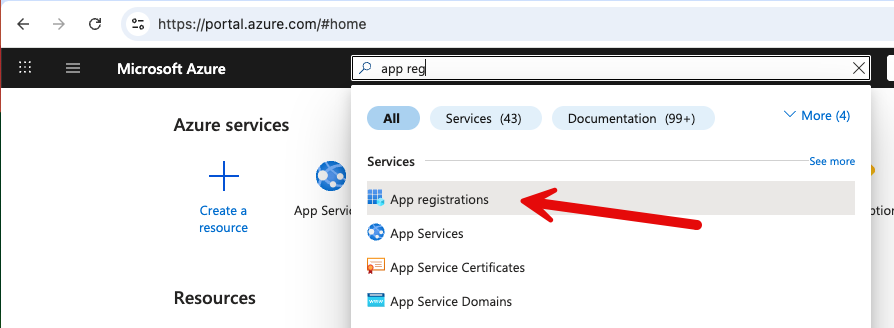
Once logged in, search for app registrations.

This will take you to a listing of all your registered applications, if any.

The next step is to register an application.

It is probably a good idea to set the redirect URL for the application. Note that the URL is http://localhost
You typically want a single-tenant application, at least for the purposes of this demo. You can later return to this screen and expand the scope if needed.
Once you save, you will be taken to the following screen.

From here, you will need two things:
- The application (or client) ID
- The directory (or tenant) ID
The next step is to navigate to the API permissions.

This will take you to a listing of the granted permissions. Typically, there will be at least one automatically granted - User.Read.
Click on Add Permission

This will take you to a screen where you can select permissions from multiple applications.
We want the first one, Microsoft Graph.
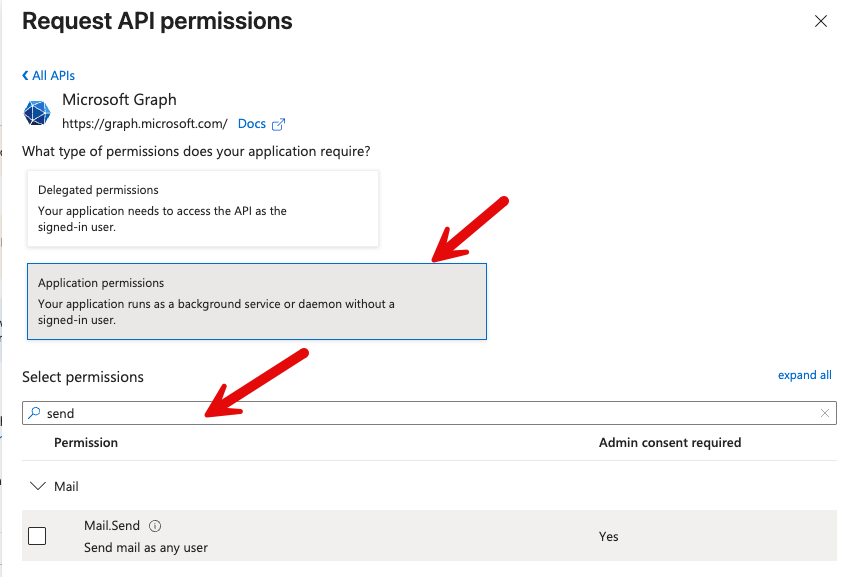
In the next screen, we can define the type of permissions we want, as well as the specific permissions.
In this case, we want Application Permissions.
We then search for the permission we need, which is Mail.Send.

There is one more step in the permissions setup - you need to Grant Admin Consent for the application

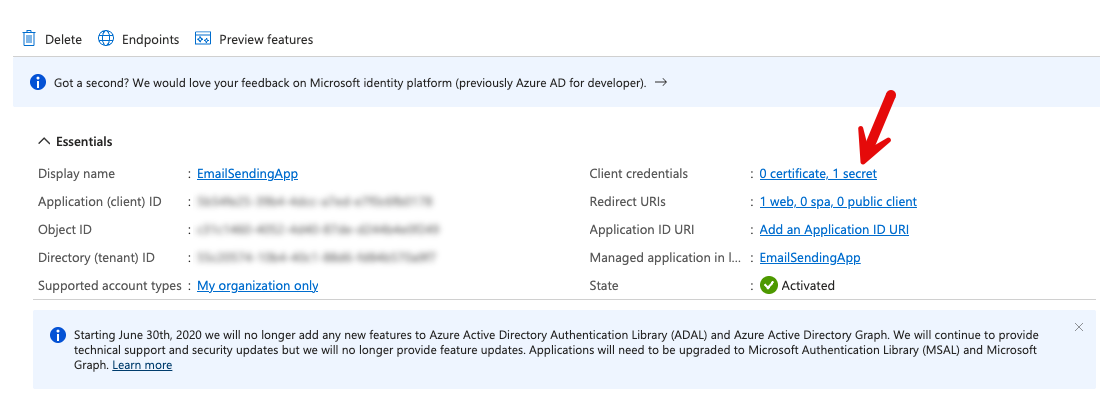
The final step is to generate the client secret from the overview screen. This is part of the information that you will need to provide to authenticate your application.

The next screen will list your client’s current secrets.

Click on New Client Secret.
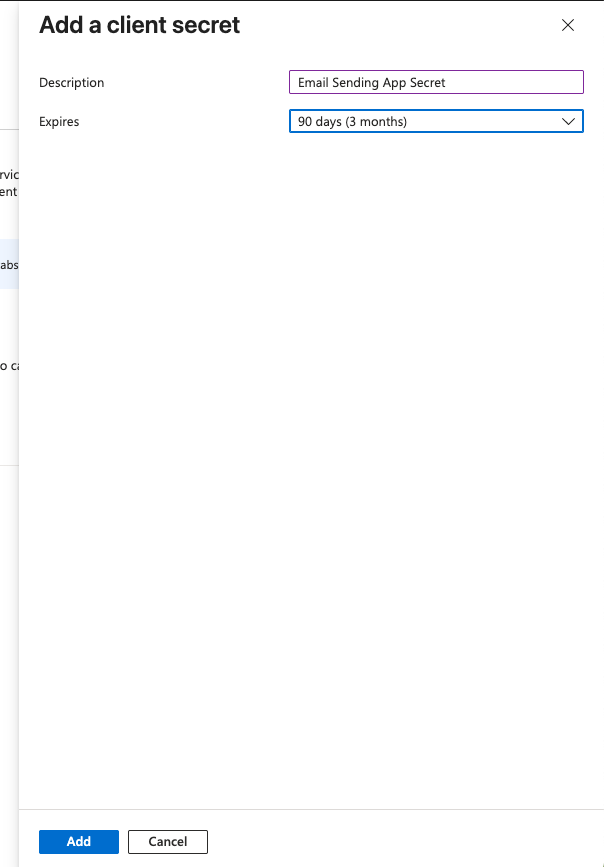
The next screen will allow you to configure your secret, typically a name and an expiry.

Upon adding, you will return to the listing screen, which displays two tokens: the Secret ID (1) and the Value (2).

What we need is the Value.
Finally, we are ready to write the code.
This process was surprisingly difficult because a lot of the documentation and samples online are either incorrect or out of date..
Install the following package - Microsoft.Graph. Make sure the version is version 5 or above. Version 4 will give you problems.
At the time of writing this, the latest version is 5.86
dotnet add package Microsoft.Graph --version 5.86.0
Next, add the Azure.Identity package. This has been necessary since the introduction of version 5 of the Graph API.
dotnet add package Azure.Identity --version 1.14.2
Next is to write the code that sends the email, which is composed of these steps:
- Define the scope for the application
- Create a ClientSecretCredential from
TenantIDClientIDClientSecret
- Create a
GraphServiceClient - Create a
Message(email) - Send the email
The code is as follows:
using Azure.Identity;
using Microsoft.Graph;
using Microsoft.Graph.Models;
using Microsoft.Graph.Users.Item.SendMail;

const string applicationID = "APPLICATION_ID";
const string tenantID = "TENANT_ID";
const string secretValue = "CLIENT_SECRET";
const string fromAddress = "cakunga@innova.co.ke";
const string toAddress = "conradakunga@gmail.com";

try
{
    // Set our scopes to the default
    var scopes = new[] { "https://graph.microsoft.com/.default" };

    // Create TokenCredential
    var credential = new ClientSecretCredential(tenantID, applicationID, secretValue);

    // Create Graph client
    var graphClient = new GraphServiceClient(credential, scopes);

    // Build email
    var message = new Message
    {
        Subject = "Test Email",
        Body = new ItemBody
        {
            ContentType = BodyType.Text,
            Content = "Test email"
        },
        ToRecipients =
        [
            new Recipient
            {
                EmailAddress = new EmailAddress
                {
                    Address = toAddress
                }
            }
        ]
    };

    // Send email
    await graphClient.Users[fromAddress].SendMail.PostAsync(new SendMailPostRequestBody
    {
        Message = message
    });

    Console.WriteLine("Message sent");
}
catch (Exception ex)
{
    Console.WriteLine(ex.Message);
}
If we run this code, it should print the following:
"/Users/rad/Projects/BlogCode/2025-07-17 - Sending To Office365/bin/Debug/net9.0/SendingEmail"
Message sent

Process finished with exit code 0.
And our inbox should have the email:

An important consideration to keep in mind is that there are throttling limits in place to prevent abuse of this API and denial-of-service degradation from code with inadvertent bugs, such as a loop with a bug in the exit clause.
You can view these limits here.
The most pertinent ones are these:
- 150 requests per 15 minutes
- 10,000 requests per 24 hours
There are per-tenant limits.
This means that each tenant can send at most 150 emails every 15 minutes, and over a 12-hour period, at most 10,000 emails.
This means that this solution will not work for mass/bulk email situations.
We will look at how to achieve that in a future post.
In our next post, we will look at how to send email using the Google Cloud API.
TLDR
The recommended way to send email using Office 365 is to use the Graph API
The code is in my GitHub.
Happy hacking!